Infrared receiver
IRremote Library
The IRremote library adds to Arduino the ability to handle both infrared remote control transmitters and receivers with the most common protocols.
How to add a new library to the Arduino environment step by step.
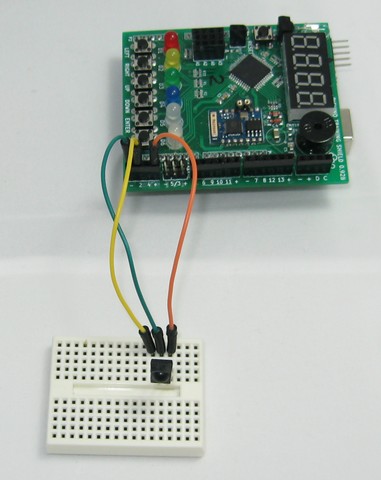
Connection
Exercises
Compile and upload the following program to the Arduino.
Once loaded, open the serial monitor and change the data reception speed to be equal to the transmission speed of the program.
Press various keys on the remote control. The key codes will appear on the serial monitor and on the 7-segment display.
 1
 2
 3
 4
 5
 6
 7
 8
 9
10
11
12
13
14
15
16
17
18
19
20
21
22
23
24
25
26
27
28
29
30
31
32
33
34
35
36
37
38
39
40
41
42
43
44
45
46
47
48
49
50
51
52
53
54
55
56
57
58
59
60
61
/*
   Lee códigos de un mando a distancia con protocolo NEC
   desde un receptor de infrarrojos.
   Envía el código por el puerto de comunicaciones serie.
   Envía el código a un display de 7 segmentos.
*/

#include <Wire.h>
#include <PC42.h>
#include <IRremote.h>
#include <Serial.h>

const long SERIAL_BAUD = 19200; // Velocidad del puerto serie en baudios
const int  RECV_PIN = 2;        // Pin de recepción de datos infrarrojos

// Inicia un receptor de infrarrojos
IRrecv ir_recv(RECV_PIN);
decode_results result;

// Extrae el código de tecla de del receptor de infrarrojos.
int ir_read(void) {
   int code;
   // Si se ha recibido un código
   if (ir_recv.decode(&result)) {
      // Si el código es de protocolo NEC, devuelve el código
      if (result.decode_type == NEC) {
         // Prepara para recibir el siguiente código
         code = result.value;
         ir_recv.resume();
         return code;
      }
      ir_recv.resume();
   }
   return -1;  // Devuelve un código de error
}


// Inicia todos los componentes
void setup() {
   Serial.begin(SERIAL_BAUD); // Inicia las comunicaciones serie
   ir_recv.enableIRIn();      // Inicia el receptor de infrarrojos
   pc.begin();                // Inicializar el módulo PC42
}

// Bucle principal
void loop() {
   int code;

   // Lee el código recibido por el receptor de infrarrojos
   code = ir_read();

   // Si es un código válido, envía el código al puerto serie y al display
   if (code != -1) {
      Serial.println(code, HEX);
      code = (unsigned)code >> 8;
      pc.dispWrite(code);

   }

   delay(50);
}
Modify the previous program so that led D1 lights up when number 1 is pressed on the remote control.
Below is an incomplete example of code to accomplish the task.
1
2
3
4
   // Enciende el led D1 cuando se presione
   // el número '1' del mando a distancia
   if (code ==  ) {
      pc.ledWrite(1, LED_ON);
Modify the previous program so that all the leds turn off when the zero button '0' is pressed.
Modify the first program so that a column of LEDs turns on and off with the '+' and '-' buttons on the remote control.
Pressing '+' on the remote control will light up a new led on the column. As '+' is pressed, all the leds will light up one by one. Pressing '-' on the remote control will turn off the last led. As '-' is pressed, all the leds will go off one by one.
To program the code it is necessary to create a variable that will count the number of leds that must be turned on. That variable will increase or decrease with the pushes of the knob. An instruction for each led will check if the variable is greater than a certain value, it will turn the led on. Otherwise it will turn off the led.
Before the
setup()block:int num_leds; // Declara la variable num_leds como un número entero
Inside the
loop()block, the variable must be incremented and decremented depending on the code received from the remote:// Si se presiona '+' aumenta el número de ledes encendidos if (code == ) num_leds = num_leds + 1;
Next, the leds must be turned on or off depending on the value of the variable:
// Si se presiona '+' aumenta el número de ledes encendidos
if (num_leds > 0)
   pc.ledWrite(1, LED_ON);
else
   pc.ledWrite(1, LED_OFF);
Modify the previous exercise so that the variable does not increase more than the total number of leds and does not decrease below zero. Two conditions will be added, one condition will limit the variable if it increases too much and another condition will limit the variable if it decreases below zero